Showing posts with label Stacey Beth Bakes. Show all posts

Wednesday, August 8, 2012

We have chosen Forks over Knives

Where has time gone?


About five weeks ago, Stacey Beth and her hubby had an intervention with themselves and with us. We sat and watched the documentary Forks over Knives, which can be seen on their site: www.forksoverknives.com  or rented from Netflix or Amazon Prime.

I can only encourage you to watch it and really open your brain to what is presented.
Since that time we have employed this into our lives and I would  like to journal with Stacey Beth some of what we discover on the way.  I have not told her yet... but she will know by Friday.

IN addition this week Terry and I watched Engine2Diet Documentary also on Netflix. The site is http://engine2diet.com/   It further educated us and we made more adjustments this week.  We are starting our day with Numedica Vegan drinks that contain a hardy amount of plant protein mixed with three fruits always including blueberries. We buy vanilla in the drink, but this is chocolate on the page and it will show you the information you need for nutrition.  We buy it from NorthLake Health Foods as Steve meets the online prices and ships free.


Meanwhile we had our first attempt at really healthy spaghetti. We surveyed our fresh veggies and used Portebella mushrooms, broccoli, onions, carrots, black beans, fresh tomatoes, fresh black olives (no oils), cauliflower and then of course whole wheat pasta. (Stacey wants us to try Rice Pasta next...but the whole wheat pasta is 9 grams of protein by itself.)  We did use one can of organic tomato paste. 

VOILA:


And then Terry had seconds:


There was a huge amount of protein but it was all plant based. Had we used ground meat we would have had much less protein. We will be doing this in an attempt to improve our health and energy as we launch into our sixties. Stay tuned as Stacey Beth and I keep up with our journey.


For health and strength and daily Bread,  We give you thanks, O Lord.

Stacey Beth and Laurie 

 "And whatever you do, whether in word or deed, do it all in the name of the Lord Jesus, giving thanks to God the Father through him." Colossians 3:17 –

Sunday, February 6, 2011

Just Plain Sweet Pantry Clean Out Day from the kitchen of Stacey Beth

Let it ice, let it freeze and then let it snow! We had a major ice storm come through and freezing temperatures for 4 days along with a lot of snow. We are in the south and this is just not something that we are fully ever prepared for. So I was limited on baking last week and also entertaining an almost two year old who could not go outside and burn energy made for an exhausting week. We were VERY blessed that we did not lose power (with the 15 minute exception on the rolling blackout) and only lost gas heat for about 8 hours.

A project that I decided to take on was to clean out our pantry, refrigerator & freezer. Here in North Texas, 1 in 3 children do not have enough to eat on a daily basis. It is very humbling to me. I could not imagine not being able to feed my child.

The picture below is one of the several tubs that will be dropped off at the food bank. Our local food bank takes frozen and refrigerated items too. Sometimes it is hard to decide what to donate. I think oh we will use it one day. Sadly that one day never comes so this time I decided to donated everything that I had that thought on. I would rather know that it actually feeds someone than sits in my pantry and expires.

When you think of your local food pantry you think of donating food. There is so much more that they need. They need personal items like deodorant, toothpaste, toothbrushes, toilet paper, shampoos and soaps. Our local Food Pantry is also in desperate need of feminine products. Another thing is baby food, formula and diapers.

My husband looked at our cleaned out, organized pantry and said that it met his standards of organization (in high school he stocked shelves at a grocery store and constantly is rearranging things I put in the pantry).......wheew....I guess I did a good job!


My challenge to everyone is to go through your pantry and make a donation. No donation is to small. Also if you get a local paper get the coupons out of it and clip them. There are numerous websites (that are free) that will tell you where the best place and time to match up your coupon. A lot of items end up being FREE or very little cost. You might not use these items, but someone else will. If you would like a list of websites that I use to help me match up mine, please send me an email and I will send you the links that I use.


For health and strength and daily Bread, We give you thanks, O Lord.


Check in tomorrow for another tasty treat.


Stacey Beth
"And whatever you do, whether in word or deed, do it all in the name of the Lord Jesus, giving thanks to God the Father through him." Colossians 3:17 –

Friday, February 4, 2011

Just Plain Sweet Chocolate Chip Blondies from the kitchen of Stacey Beth

Happy Birthday to my WONDERFUL stepmother, Darlena. I am so blessed that you chose to marry my Father and to accept me as your daughter. In honor of your birthday I have made Chocolate Chip Blondies. They are super simple and are always a crowd pleaser!


Here is what you will need to make Blondies:

1 1/2 Sticks of Unsalted Butter

1 1/2 Cups Gold Medal All Purpose Flour

1 Teaspoon of Rumford Baking Powder

1/4 Teaspoon of Morton Sea Salt

1 Cup Imperial Light Brown Sugar

1/2 Cup Imperial Dark Brown Sugar

2 Large Egglands Best Eggs

1 1/2 Teaspoon McCormicks Vanilla Extract

1/2 Cup Nestle Semi Sweet Chocolate Chip Morsels


1. Pre-heat your oven to 350 degrees. Line an 8X8 baking an with foil and spray with cooking spray.


2. Melt your butter in coffee cup (or a microwaveable safe dish) in the microwave and then combine with the sugars. Mix on low speed for 30 seconds.


3. Add the eggs and the vanilla to the sugar mixture and mix on low for 1 minute.

4. Add the flour, salt and baking soda and mix on low for 2 minutes or until well incorporated.


5. Fold in the Chocolate Chips with a spoon.


6. Spoon the mixture into the prepared baking dish and place into the oven. Bake for about 40 to 45 minutes. Insert a knife or toothpick in the middle of the Blondies. If it comes out clean, then they are ready.


7. Once the Blondies are out of the oven, remove the foil from the pan and set them on the counter to cool. Remember to put them on an oven mit or something that is heat resistant so you will not damage your counter.


8. Once completely cool (about 45 minutes) cut into 9 squares and enjoy!


For health and strength and daily Bread, We give you thanks, O Lord.
Check in tomorrow for another tasty treat.
Stacey Beth
"And whatever you do, whether in word or deed, do it all in the name of the Lord Jesus, giving thanks to God the Father through him." Colossians 3:17 –


Friday, January 28, 2011

Just Plain Sweet Sweet Deals from the Kitchen of Stacey Beth

There is a joke in my family about how coupon savvy I attempt to be and how I am always seeking a good deal. I am not an expert in couponing, but I do try when I find the products that we use. I love when a stumbled across a good deal when I am not looking and I thought that I would share it with you.

My 2 year old and I were walking around our local Walgreens so I could do some coupon shopping when I noticed a cart in the back of the store that was full of baking goods, including the the Nestle Toll House Semi Sweet Morsels in the picture below. I use these in all of my recipes that require chocolate chips.

As I picked up the first bag I looked at the orange sticker that said reduced and .82 cents on it. My heart rate sped up and I got a little giddy as I looked at expiration date thinking that they were probably close to expiring. I was wrong.....these have a long way to go and I got them super cheap!


Lesson learned - always be on the look out. I personally bought all that they had and have stocked the shelves of my pantry.


For health and strength and daily Bread, We give you thanks, O Lord.

Check in tomorrow for another tasty treat.


Stacey Beth
"And whatever you do, whether in word or deed, do it all in the name of the Lord Jesus, giving thanks to God the Father through him." Colossians 3:17 –


Thursday, January 27, 2011

Just Plain Sweet Happy Birthday Cupcakes from the Kitchen of Stacey Beth

Happy 30th Birthday to my little brother. Welcome to the 30's club! My life would not be the same without you.

My 2 year old was a big helper today (so please excuse the really bad photos as I was trying to balance her along with with camera and the ingredients).. I love this recipe for so many reasons. The biggest reason is that you can cut the entire thing in half (even the frosting recipe) and have half as many delicious cupcakes. This recipe as is yields 24 Cupcakes.

Here is what you will need for the cupcakes:
1 3/4 Cups Cake Flour (non rising)
1 1/4 Cups Gold Medal All Purpose Flour
2 Cups of Imperial Sugar
1 Tablespoon of Rumford Baking Powder
1/4 teaspoon Morton Sea Salt
2 sticks of unsalted butter (cut and cubed at room temperature)
4 Large Egglands Best Eggs
1 Cup of Horizon Whole Milk
1 Teaspoon of McCormick Vanilla Extract

Here is what you will need for the frosting:
2 Sticks of butter soften at room temperature
8 Cups of confectioners' sugar
1/2 Cup Horizon Whole milk
2 Teaspoons of McCormick Vanilla Extract


1. Preheat oven to 325 degrees and line your cupcake pans with cupcake liners.

2. Combine the flours, sugar, baking powder and salt in a large mixing bowl. Combine well with a spoon.
3. Add in the cubed butter and the eggs. Mix on a low speed for about 1 1/2 minutes.

4. Slowly add the milk and vanilla as you continue to mix for another minute until fully incorporated.


5. Fill the cupcake pans until they are about 2/3 full and bake for about 20 minutes. Pull them out and let them completely cool before icing.
6. While the cupcakes are baking, Cream your butter, 4 cups of you sugar, your milk & vanilla. Slowly add the remainder of the sugar until the frosting is the consistency you want it to be.
I added blue food coloring to my icing in celebration of my brothers birthday.


7. A great icing tip that I learned is to take a ziplock bag and place it into a large cup with the edges folder over. Spoon your icing into the bag, seal it up and then cup off the tip to pipe out the icing.


8. Enjoy these yummy cupcakes and store them in the refrigerator for up to 2 days.


For health and strength and daily Bread, We give you thanks, O Lord.


Check in tomorrow for another tasty treat.


Stacey Beth
"And whatever you do, whether in word or deed, do it all in the name of the Lord Jesus, giving thanks to God the Father through him." Colossians 3:17 –


Wednesday, January 26, 2011

Just Plain Sweet Peanut Butter Kisses from the Kitchen of Stacey Beth

The combination of peanut butter and chocolate is one of the best. I love any type of dessert that has both. Normally for most baking I will use my hand held mixer, but when mixing with peanut butter I have found that my big standing mixer is easier and less messy to use.

Here are the ingredients that you will need:
24-30 Hersey Kisses (frozen)
1/2 Cup Crisco Shortening
3/4 Cup Jif Creamy Peanut Butter
1/3 Cup Imperial Sugar
1/3 Cup Imperial Light Brown Sugar
1 Egglands Best Egg
2 Tablespoons of Horizon Whole Milk
1 Teaspoon McCormick Vanilla
1 1/2 Cup Gold Medal Flour
1 Teaspoon of Arm and Hammer Baking Soda
1/4 Teaspoon of Morton Sea Salt
1 Cup Sugar in the Raw

This will yield between 24-30 cookies.


1. Preheat the oven to 375 degrees and line your cookie sheets with Reynolds Parchment Paper.

2. Beat the shortening and peanut butter on low for 1 minute


3. Add the sugars, egg, milk and vanilla and beat for another 45 seconds.
4. Slowly add the flour, baking soda and salt and mix for another 1 minute.

5. Scoop out your mixture with your ice cream scoop into a 1 inch ball and then roll in your Sugar in the Raw.


6. Line up 8 balls on 1 cookie sheet and bake for 10 minutes.


7. While the cookies are baking, remove the kisses from the freezer and unwrap them. Once you remove the cookies from the oven immediately press the kisses into the center. Allow to cool on the cookie sheet for 5 minutes and then move to a cooling rack.


For health and strength and daily Bread, We give you thanks, O Lord.

Check in tomorrow for another tasty treat.


Stacey Beth
"And whatever you do, whether in word or deed, do it all in the name of the Lord Jesus, giving thanks to God the Father through him." Colossians 3:17 –


Tuesday, January 25, 2011

Just Plain Sweet Tiger Butter from the Kitchen of Stacey Beth

There are some days that I dream about peanut butter. I love easy recipes that incorporate it that are sweet and extra yummy! This recipe calls for just 3 ingredients.

Here is what you will need:
1 pound of Almond Bark
1/2 Cup of Jif Creamy Peanut Butter
1/2 Cup of Nestle Semi Sweet Morsels

1. Line a cookies sheet with foil so all of the edges are covered.

2. Cut the almond bark into squares (so it melts faster) and add the peanut butter. Place all of this in a bowl that can go into the microwave.

3. Measure out the chocolate chips into a microwavable bowl.
4. Melt the almond bark and peanut butter in the microwave for 4 minutes. Be careful when you take it out. It will be hot.


5. Melt the chocolate chip morsels in the microwave for 1 1/2 minutes. Be careful when you take the bowl out. It will be hot.

6. As the chocolate chips are melting, spread the peanut butter almond bark mixture in the foil lined cookie sheet.

7. Take a spoon and spread the melted chocolate throughout the peanut butter almond bark mixture.


8. Allow the pan to completely cool and harden on the counter for 45 minutes. Lift the foil out of the cookie sheet and cut the tiger butter into squares.


9. Enjoy the Tiger Butter! I store in the freezer in a ziplock bag because I like it really cold. If you would like store in an air tight container for up to 3 days.


For health and strength and daily Bread, We give you thanks, O Lord.


Check in tomorrow for another tasty treat.


Stacey Beth
"And whatever you do, whether in word or deed, do it all in the name of the Lord Jesus, giving thanks to God the Father through him." Colossians 3:17 –


Monday, January 24, 2011

Just Plain Sweet Pound Cake from the kitchen of Stacey Beth

Truth be told........I am a picky eater. I do not eat mashed potatoes, but I will eat a baked potato. I will not eat corn nibblets or corn on the cob, but will eat anything that has corn in it. So it is no surprise when my mother told me that when I was little that the only thing that she could get me to eat was this pound cake with peanut butter (for protein) on it. To this day it is still a favorite and I will use peanut butter or drizzle icing on it. It is a rich, dense pound cake that I cannot do justice to describing. You must make it and taste it for yourself.

Here is what you need:
3 Cups of All Purpose Flour
3 Cups of Sugar
1 Teaspoon of Rumford baking powder
1 Cup of Crisco Shortening
1 stick of butter
5 Egglands Best eggs
2 Tablespoons of McCormick Imitation Butter flavoring
1 Tablespoon of McCormick Almond Extract
1 Cup of Horizon Milk

1. Preheat oven to 325 degrees and grease your bunt pan with a cooking spray.

2. Melt the butter and the shortening until it is liquid (about a minute). Find the largest mixing bowl that you have (mine is a 4 quart) and pour the mixture into the bowl.

3. Add the sugar and then mix in the eggs 1 at a time. Once fully combined, here is what you will get.


4. Add the baking powder to the mixture and then add 1/3 of the flour and milk and mix. Add another 1/3 of the flour and milk and mix. Add the last 1/3 of the flour and milk, then the almond extract and the imitation butter, mix thoroughly (about 1 1/2 minutes) and this is what you will have.


5. Pour into a greased bunt pan and bake at 325 for 45 minutes. After the 45 minutes increase the temperature to 350 degrees and cook for an additional 30 minutes.

6. Remove the Pound Cake from the Oven and allow to cool completely. The top will be a light golden color and the sides a darker golden brown.
I am sorry that I do not have a picture of the finished product. My camera stopped working - I think that it may be time for a new one!


For health and strength and daily Bread, We give you thanks, O Lord.


Check in tomorrow for another tasty treat.


Stacey Beth
"And whatever you do, whether in word or deed, do it all in the name of the Lord Jesus, giving thanks to God the Father through him." Colossians 3:17 –


Friday, January 21, 2011

Just Plain Sweet White Chocolate Macadamia Nut Cookies from the kitchen of Stacey Beth

White Chocolate Macadamia Nut Cookies are cookies that I always imagined were harder to make than they are. I think it is because looking at the price of the macadamia nuts shyed me away from wanting to try. I actually did not know until tonight how much my husband really liked them until half of them were gone from the plate.

Here are the ingredients needed for this recipe:

2 1/4 cups Gold Medal All-purpose flour
1/4 teaspoon Morton’s Sea Salt
1 teaspoon Arm and Hammer baking soda
1 Egglands Best egg and 1 extra yolk
2 Tablespoons Horizon Whole milk
1 1/2 teaspoons McCormick’s vanilla extract
2 sticks unsalted butter (melted)
3/4 cup Imperial sugar
3/4 cup Imperial brown sugar
2 cups Nestle white chocolate chips
1 cup of Diamond Macadamia Nuts (roughly chopped)

1. Preheat oven to 375°F. Line baking sheets with Reynolds parchment paper. Melt butter - Easy tip - melt both sticks in a coffee mug in the microwave for 1 minute.

2. Roughly chop the macadamia nuts and mix the vanilla, milk and eggs in a separate bowl.


3. Cream together the melted butter and sugars for about a minute and thirty seconds, until pale and fluffy. I put the sugars in the bowl first, poor the melted butter on top and then start mixing.

4. Pour in the egg, vanilla and milk. Mix for another minute.


4. Mix in flour, baking soda and salt on a low speed until everything is fully incorporated, about a minute. Easy tip – for this recipe I just measure out the dry ingredients into the same bowl of the wet ones to save myself from washing an extra bowl.


6. Once the dry and wet ingredients are fully incorporated, mix in the chips & nuts with a spoon.


7. Scoop 1-inch balls of dough and place on the parchment paper lined cookie sheet about 2 inches apart . Easy tip – use an ice cream scoop – they will all be the exact same size.


8. Bake for 11-12 minutes rotating the cookie sheet 180 degrees after 6 minutes for even baking.

9. Let cookies set on baking sheet for 5-6 minutes and then remove to a cooling rack. Store cookies in an airtight container.This yields 3 dozen cookies.


For health and strength and daily Bread, We give you thanks, O Lord.


Check in tomorrow for another tasty treat.


Stacey Beth
"And whatever you do, whether in word or deed, do it all in the name of the Lord Jesus, giving thanks to God the Father through him." Colossians 3:17 –


Thursday, January 20, 2011

Just Plain Sweet's Thursday's Tip of the Day - The Clean Up Bowl - from the kitchen of Stacey Beth

I would love to tell you that I am neat and organized. I strive for that on a daily basis and fail miserably. So when it comes to baking I tend to make it a little more chaotic ( and messy) than it needs to be. The surface that I use to prepare and mix everything on is not near the garbage can or the sink. So I use a big bowl that I call the clean up bowl. I put everything that I am done with in the clean up bowl from the measuring cups to spoons to beaters and even egg shells and butter wrappers. This gives me one place that it all goes that helps me make clean up a little bit faster and easier.
So if you have never used a "clean up bowl" try it and see if it is easier for you.
For health and strength and daily Bread, We give you thanks, O Lord.
Check in tomorrow for another tasty treat.
Stacey Beth
"And whatever you do, whether in word or deed, do it all in the name of the Lord Jesus, giving thanks to God the Father through him." Colossians 3:17 –

Wednesday, January 19, 2011

Just Plain Sweet Pineapple Cobbler from the Kitchen of Stacey Beth

I HEART Pineapple. I love it with chicken, with rice, on pizza......pretty much anything. I love it especially when I can incorporate it into a quick and easy dessert (that takes only one bowl for preparation) that warms my tummy. This recipe is great because the ingredients are things I always have on hand and never have to make an extra trip to the store before I begin.

Here is what you will need:
  • 1 Cup of Gold Medal All Purpose Flour
  • 1/8 of a teaspoon of Morton Sea Salt
  • 1 Cup of Imperial Sugar
  • 1 Tablespoon of Rumford Baking Powder
  • 3/4 Cup of Horizon Whole Milk
  • 1 teaspoon of McCormicks Vanilla Extract
  • 1 stick of unsalted butter (melted)
  • 1 20 oz can of Dole Pineapple Chunks (drained from their juice)
1. Preheat your oven to 375 degrees.

2. In a bowl mix the flour, sugar, baking powder, salt, vanilla and milk. Stir until the batter is smooth.

3. Stir in the melted butter gently.

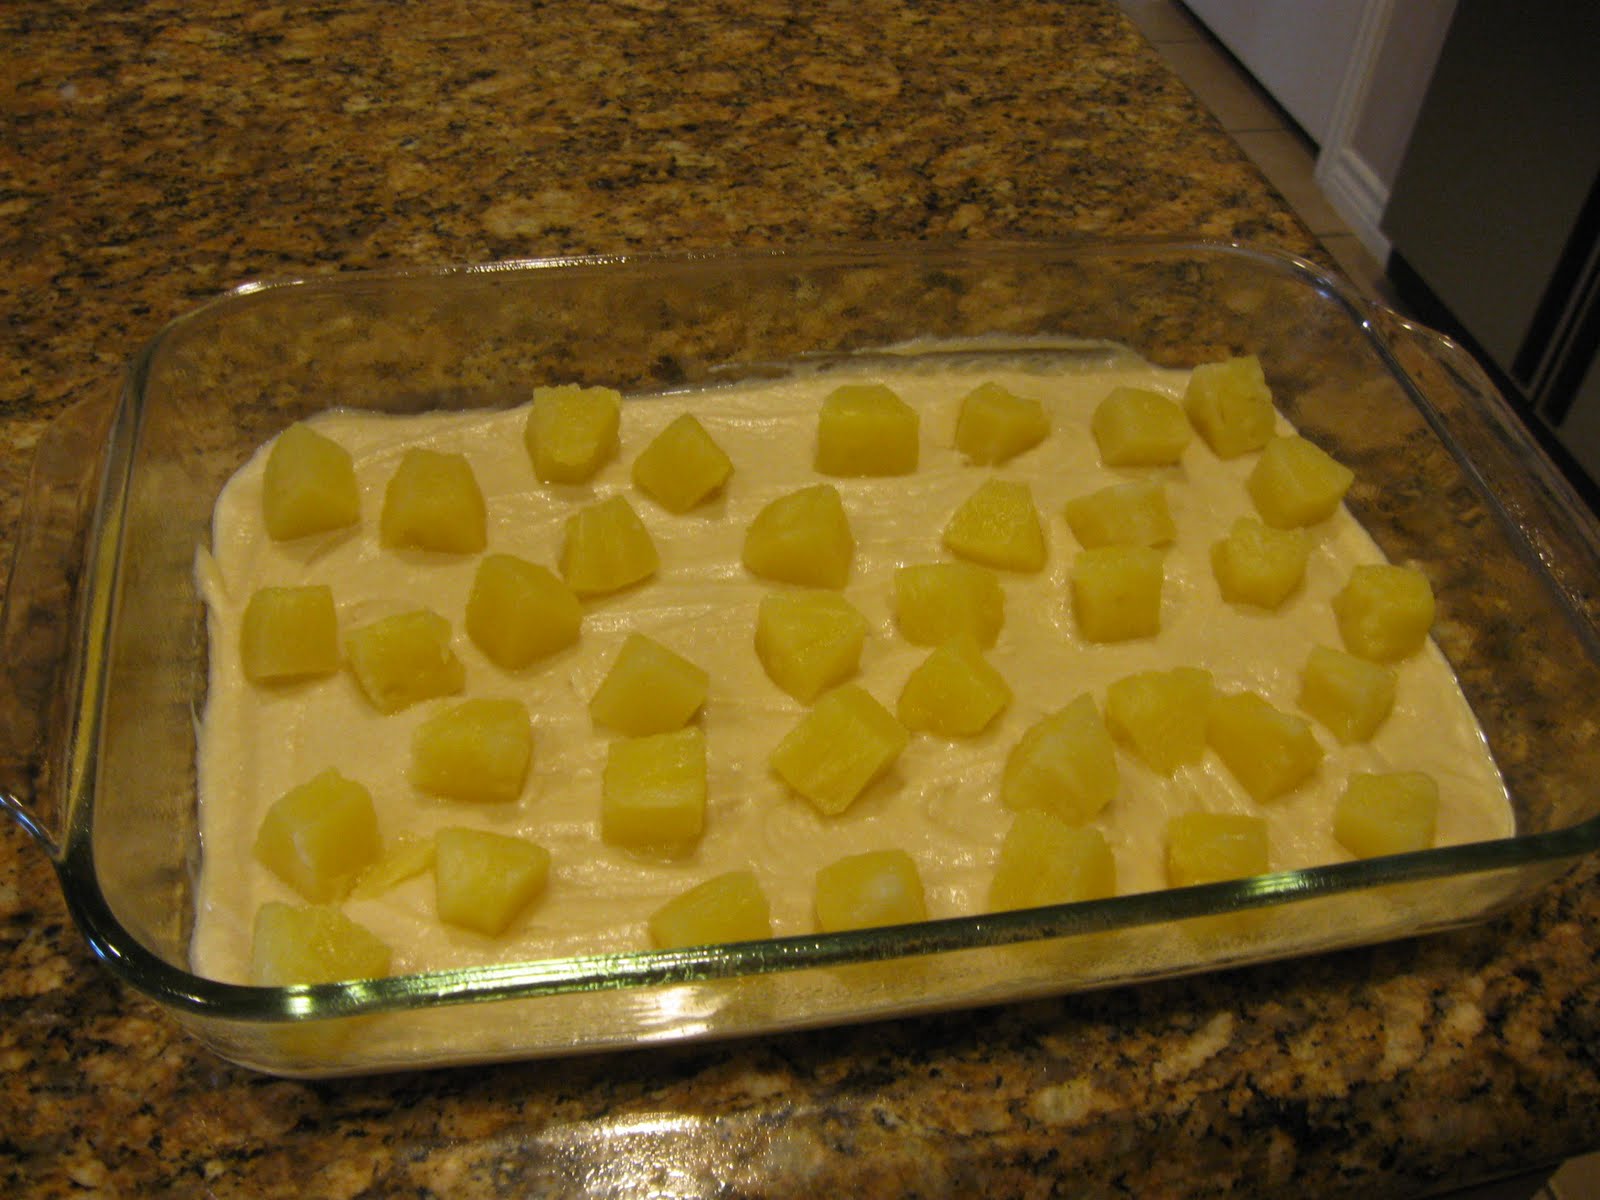
4. Pour the batter into the 9X13 pan and spread it evenly (it will be a thin layer). Scatter the pineapple chunks across the top.

5. Bake for about 25 minutes until the pineapple chunks have dropped to the bottom of the pan and the top of the batter has puffed up and turned a golden brown.
6. Let cool for about 15 minutes and serve with ice cream.


For health and strength and daily Bread, We give you thanks, O Lord.


Check in tomorrow for another tasty treat.


Stacey Beth 
"And whatever you do, whether in word or deed, do it all in the name of the Lord Jesus, giving thanks to God the Father through him." Colossians 3:17 –


Share Just Plain Sweet for You.